I used to give guitar lessons, and there was an interesting difference between teaching kids and teaching adults. As you'd expect, adults generally had more natural coordination than kids, but unlike kids, they weren't used to being bad at things, so when they picked up a guitar for the first time and couldn't play it, they assumed the problem was permanent. I got a lot of definitive statements: "I'm bad at guitar." (Kids, by contrast, are learning all the time, kind of expect to start out incompetent, and just keep plugging along.)
The only thing I could say in those situations was "I can't promise that you'll be a virtuoso guitarist, but I can definitely promise you this: IF YOU PRACTICE, YOU WILL GET BETTER."
I have to keep reminding myself of my own advice every time I sit down to work on pixel art for Witcheye. A cursory glance at Twitter confirms that I am still not the world's greatest pixel artist--there's so much amazing work on my feed that I sometimes want to throw the laptop out the window--but I can at least say that I've gotten a lot better at it since I started this project.
I never even intended to be a pixel artist, actually. I just started on it because I needed art for this game. Luckily, I had the benefit of a ton of established knowledge on good technique. To the degree that any of this work looks presentable, it's due in no small part to great tips and tutorials from Helm, Derek Yu, Cyangmou, et al. If you're in the same boat as me, here are the tips that helped me the most. If you put your shaky confidence out of your mind and just try to adjust your work to these instructions, it'll probably improve--mine did. I still have a long way to go, but it's nice to see some distance traveled already.
1. Where's the light coming from?
Neophyte artists tend to have trouble with shading. When you're coloring in a line drawing, it's really tempting to put the dark color(s) near your outline, and the light color(s) in the middle of your object. Pixel artists call this "pillow shading" because it makes everything look like a puffy pillow. Luckily, better lighting isn't SO hard to do. (Obviously you could spend a lifetime learning about light, but it's easy to improve a lot right at the beginning.) Just think about where the light is coming from, and color the part of the object it'd fall on a bit lighter. Then color the part that would be in shadow a bit darker. If you're working in a style that includes outlines, you can even recolor the outline to be lighter near the light part--that tends to make it feel more three-dimensional. (A one-color outline can really flatten things out.)
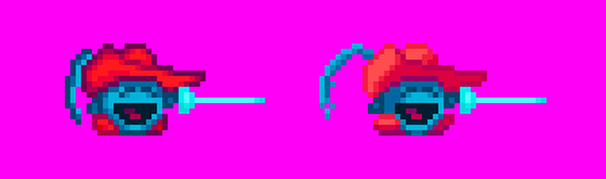
I accidentally pillow-shaded this goofy little chevalier the first time around. The version on the right has more consistent lighting.
For game purposes, it may not be really possible to have all the lighting be totally consistent--sprites get flipped and rotated, etc. Derek Yu suggests placing your main light source above and slightly to one side of your objects. That's where most light comes from in the real world, after all, and light scattering is idiosyncratic enough in life that little inconsistencies between objects shouldn't be too glaring.
2. Keep it simple.
A lot of people say pixel art is about packing a lot of information into a tiny space. That's definitely true. But it doesn't mean you should fill your designs with a ton of fussy little details. I think it's better to have designs that read clearly, especially if you're going to try to animate them. If you draw a monster with 800 wriggling tentacles, you're going to be really stressed when you try to draw it again rotated 45 degrees to the left, and try to keep everything consistent.
For this game, I'm working in quite a low resolution--functionally, 256x144, smaller even than a NES screen. (I wanted it to look "pixel-y" even on a tiny phone screen.) Enemies are mostly 16x16, the size you see in Kirby's Adventure or the original Legend of Zelda. Complicated designs just don't work at that scale. Because of that, the character designs in those games have a simplicity that, as a nice bonus, is often quite lovely. I can't claim to be designing creatures as immortal as the noble Octorok, but it's a nice goal to shoot for.
Who needs arms? Not this guy!
3. Use fewer shades.
Unlike our 8- and 16-bit era forebears, we 21st-century indie developers have access to an unlimited panoply of colors. This is a hideous trap that should be avoided at all costs. Unless you REALLY know what you're doing, using a lot of colors is very likely to turn your work into a swampy mush. (It will also be much, much harder to animate--see above.) I ignored this advice at first--using a bunch of colors is so tempting, especially if you don't yet have the skill to make things read cleanly with fewer. I wish I hadn't. Now, for small to mid-sized creatures, I try to keep my colors to three shades per hue, with two extras between each used only for antialiasing. (More on antialiasing below.) So if I'm using red, I'll have dark red, medium red, and light red, and that's it. Think really carefully about whether you need more than that. (If you look at the #pixelart hashtag on Twitter, you'll see people much more talented than I am doing incredible things with incredibly few colors.)
(Here's an interesting aside: the irony is, in the 8- and 16-bit eras, they actually probably could've used more colors, because blurry old-school CRTs would smooth out the shading into nice soft gradients. It's only on sharp modern LCDs that that kind of color density starts to look like a cluttered, heavily-artifacted mess; pixel art orthodoxy has been forced to adapt.)
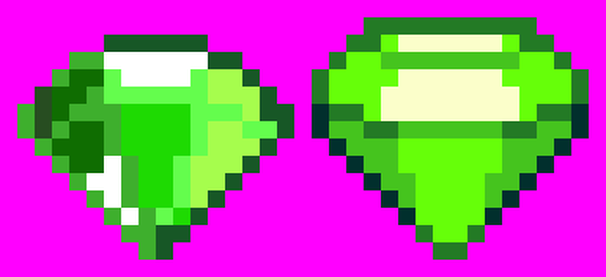 The old version of the gem (on the left) has twice as many colors, to no particularly good end.
4. Use fewer hues.
Again, a problem of abundance: there's nothing stopping you from giving a character green skin, purple eyes, a blue hat, one red shoe and one yellow one. And when you're trying to make each element read as separate in a tiny space, it can be tempting to do that. Every time I revisit my earlier art for this game, I've consolidated hues, and every time, the art feels more consistent, more clean, and more characterful. (Think about how you can see a streak of blue, red, and white and instantly identify Sonic the Hedgehog.)
Again, a problem of abundance: there's nothing stopping you from giving a character green skin, purple eyes, a blue hat, one red shoe and one yellow one. And when you're trying to make each element read as separate in a tiny space, it can be tempting to do that. Every time I revisit my earlier art for this game, I've consolidated hues, and every time, the art feels more consistent, more clean, and more characterful. (Think about how you can see a streak of blue, red, and white and instantly identify Sonic the Hedgehog.)
Dude definitely doesn't need a green hat--notice how the bottom two rows hang together a lot better than the top one.
It's also great to have your color ramps overlap--that too will pull the piece towards greater cohesiveness. The middle row of Waddler sprites was probably fine, but in the second revision, the darkest color of blue on the body doubles as the darkest color on the shoes. The lighter parts of the shoes are shoe-colored--brown--but the dark gray-blue reads as a shadow, and makes the whole thing feel more of a piece.
5. Shift your hues.
I know I said if I was using red, I'd use dark red, medium red, and light red. That actually ends up looking kind of boring, so what I'd ACTUALLY do is use purplish red, red, and orangish red. Instead of just adjusting the brightness of a color, you can shift the darker tones towards "cooler" parts of the color wheel (generally, blue) and shift the lighter tones towards "warmer" parts (generally, yellow). You'll find the colors have a lot more punch and vitality. There's a great article about this at work in the beautiful pixel art game Frogatto here.
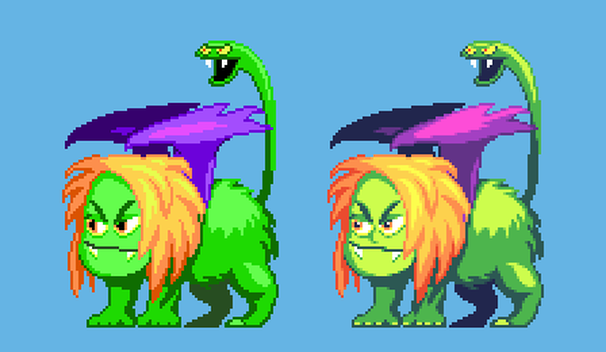
Stewart the Manticore, drafted with flat colors vs. polished with hue-shifting--see the way the green on the body goes towards yellow in the highlights and blue in the shadows.
6. Antialias sparingly.
Antialiasing is smoothing out a pixel-y edge between two colors by placing pixels of an intermediary color along the jaggier bits. When you first learn about it, it's easy to go overboard, and then you can lose details and (again) turn your work into a blurry mush. One rule I've found really helpful is to not add an antialiasing pixel unless the angle of the edge has changed. It's a little hard to describe, so here's an example.
Antialiasing is smoothing out a pixel-y edge between two colors by placing pixels of an intermediary color along the jaggier bits. When you first learn about it, it's easy to go overboard, and then you can lose details and (again) turn your work into a blurry mush. One rule I've found really helpful is to not add an antialiasing pixel unless the angle of the edge has changed. It's a little hard to describe, so here's an example.

This is a simplified bit of a cloud background I was working on. On the left, you can see where I overdid it on the antialiasing, unintentionally giving the edges an angular look. The antialiasing pixels should describe the curve of the edge.
7. Control saturation.
Or to put it more broadly, separate your layers. I think it's really important in game design to have the screen be instantly readable at a glance. Look at how clear these screens from Mega Man 4 and 5 make the distinction between foreground and background:
7. Control saturation.
Or to put it more broadly, separate your layers. I think it's really important in game design to have the screen be instantly readable at a glance. Look at how clear these screens from Mega Man 4 and 5 make the distinction between foreground and background:
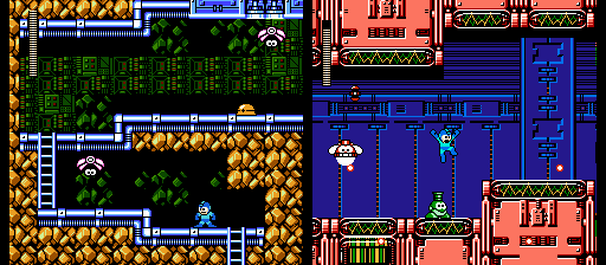
So crisp! So readable! So immaculately rendered!
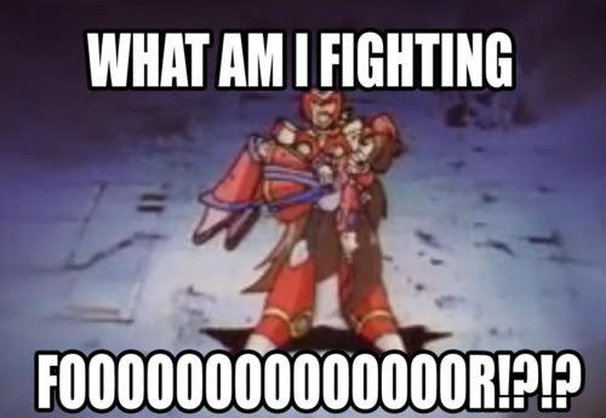
Then look at the hash this Mega Man fangame makes of it:
Where the fuck am I
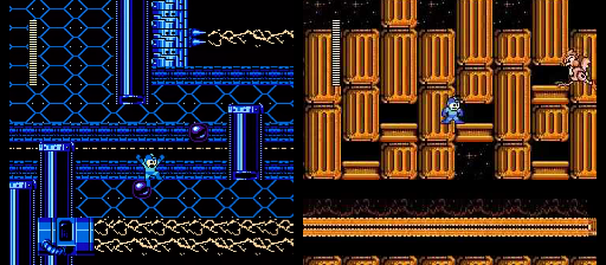
With the limited palette of the NES, Mega Man and other 8-bit games had to rely on color contrast to separate out foregrounds, backgrounds, and objects. That's certainly one way to do it. But if you have access to more colors, one nice approach is to control your saturation such that objects and (to a lesser extent) foreground topography are rich with color, while non-interactive backgrounds are desaturated (closer to gray, essentially). Here's an area where I think I did a decent job of that.
I hope some of this is helpful! (And again, it's really just consolidating a lot of great advice from pixel art forums and tutorials.) You may not be the one to make the next Owlboy or Iconoclasts--I know I won't--but you can certainly make your projects more eyecatching with a little practice. Thanks for reading!
 RSS Feed
